
Okay, so we’ve all been there—staring at our poor, root-bound plant baby, knowing it needs a bigger home but being absolutely TERRIFIED of somehow murdering it in the process. Been there, done that, got the dead pothos to prove it.
Let me just start by saying this: I killed my first three plants trying to repot them. Seriously. I thought I was being gentle, I thought I was doing everything right, and then BOOM—yellow leaves, droopy stems, and a one-way ticket to plant heaven.
My friend Jess (who somehow has a jungle in her 500-square-foot apartment) literally had to stage an intervention. She sat me down, handed me a glass of wine, and said, “Babe, you’re overcomplicating this. Learning how to repot houseplants step by step is literally the easiest thing ever—you just need a system.”
And honestly? She was so right.
If you’ve been putting off repotting because you’re convinced you’ve got a black thumb, this is your sign to finally do it. I’m spilling ALL my secrets today—the mistakes I made, the game-changing tricks I’ve learned, and the exact process I now use to repot my growing plant collection without any casualties. Whether you’re a plant mom of one or twenty, this guide is for you, girl!
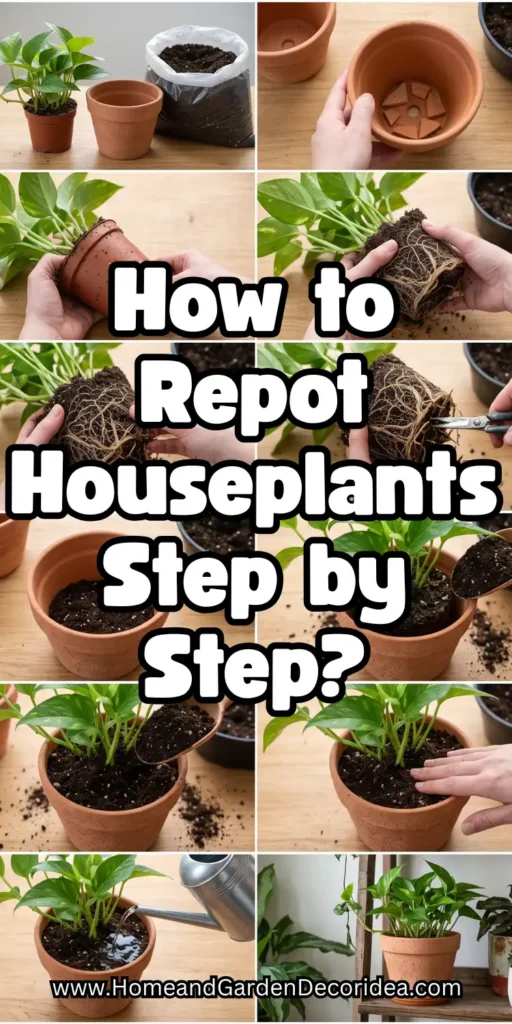
Why Repotting Matters More Than You Think
Okay, real talk: most of us ignore repotting until our plants look like they’re about to escape their pots and take over our living rooms. But here’s the thing—learning how to repot houseplants step by step isn’t just about giving them more space. It’s literally about refreshing their entire living situation!
When you repot, you’re replacing old, depleted soil with fresh, nutrient-rich goodness. You’re giving those roots room to breathe and stretch. You’re checking for hidden issues like root rot or pests before they become full-blown disasters. Honestly, it’s like giving your plant a spa day, a new wardrobe, AND a bigger apartment all at once.
Pro tip: The best time to repot is spring or early summer when plants are actively growing. But if your plant is seriously root-bound and screaming for help (hello, roots growing out the drainage holes!), don’t wait—just go for it!
What You’ll Need (No Fancy Equipment Required!)
Before we dive into the actual steps of how to repot houseplants step by step, let’s talk supplies because I made the mistake of starting without everything I needed and ended up with dirt EVERYWHERE. Literally, I found soil in my hair for days. Not cute.
Here’s my go-to checklist:
| Item | Why You Need It | Pro Tip |
|---|---|---|
| New pot | 1-2 inches larger than current one | Terracotta is breathable; plastic retains moisture |
| Fresh potting mix | Specific to your plant type | Succulent/cactus mix is a MUST for desert plants |
| Drainage rocks | Prevents root rot | Skip if pot has good drainage |
| Trowel or small shovel | Makes scooping soil easy | A kitchen spoon works in a pinch! |
| Watering can | For post-repot watering | Room temp water—never cold! |
| Scissors or pruning shears | For trimming dead roots | Sterilize with rubbing alcohol first |
You don’t need to spend a fortune here, girl. I literally got my trowel from the dollar section at Target, and it works perfectly. My friend Sarah uses an old chopstick to aerate soil, and honestly, that’s genius.
One thing I don’t recommend: those decorative pots without drainage holes. They’re cute, sure, but they’re a one-way ticket to overwatering city. If you absolutely love one, plant in a nursery pot and hide it inside the pretty one!
How to Repot Houseplants Step by Step: The Actual Process
Alright, deep breath! This is what you came for. I’m going to walk you through exactly how to repot houseplants step by step, and I promise—if I can do it without killing my plants anymore, you definitely can.
Step 1: Water Your Plant (The Day Before)
This is the ONE step everyone skips, and it’s honestly the most important. Watering your plant 1-2 days before repotting makes the roots more flexible and less likely to break. Think of it like stretching before a workout—you’re just loosening everything up!
Step 2: Gently Remove the Plant
Place your hand over the top of the soil with the plant stem between your fingers, flip the pot upside down, and gently tap the bottom. If the roots are seriously stuck, run a butter knife around the inside edge. Whatever you do, don’t yank! I literally pulled the entire stem off a snake plant once and wanted to cry.
Step 3: Loosen and Inspect the Roots
Now for the satisfying (and slightly messy) part! Gently massage the root ball to loosen tightly packed roots. You want to see them start to separate naturally. This is also when you’re looking for any brown, mushy roots—snip those off immediately. Healthy roots should be white, creamy, or tan.
What not to do: Don’t wash ALL the old soil off unless you’re dealing with root rot. Some of that beneficial dirt staying behind actually helps them adjust faster to their new home!
Step 4: Prepare Your New Pot
Add a layer of fresh potting mix to the bottom of your new pot. You want the top of the root ball to sit about an inch below the rim. Test it by placing your plant in there without adding more soil—you can always add or remove before the final fill.
Step 5: Position and Fill
Center your plant in the new pot (make sure it’s straight, I’ve had some leaning disasters), then start adding fresh soil around the sides. Gently firm it down as you go to eliminate those pesky air pockets. Tap the pot on the counter a few times to help everything settle.
Step 6: Water It In
Give your newly repotted plant a good drink of water to help the soil settle around the roots. Then—and this is KEY—water it again about 15 minutes later. The first watering wets the soil, and the second ensures those deep roots actually get moisture.
Common Repotting Mistakes (Swipe Left on These)
I’ve made every single mistake in the book, so you don’t have to. Here’s what NOT to do when learning how to repot houseplants step by step:
Mistake #1: Going Too Big – A pot that’s waaaay too big means extra soil that stays wet forever, leading to root rot. Your plant wants to be cozy, not swimming in dirt!
Mistake #2: Using Garden Soil – Big no. Garden soil is too heavy and doesn’t drain properly indoors. Always use a quality potting mix.
Mistake #3: Fertilizing Immediately – Wait at least 4-6 weeks before fertilizing. The fresh soil already has nutrients, and your plant needs time to recover from the shock.
Mistake #4: Overwatering After Repotting – Those roots are stressed, girl! Water once, then let the top inch dry out before watering again.
Mistake #5: Repotting When Not Needed – Not every plant wants or needs to be repotted. Some actually like being root-bound! Orchids and peace lilies? They’re drama queens who prefer tight spaces.
Aftercare: Keeping Your Plant Alive (The Hardest Part)
Okay, you’ve successfully learned how to repot houseplants step by step, and now your plant is in its gorgeous new home. But the real work? It’s just beginning!
For the first few days, your plant might look a little dramatic. Maybe it droops, maybe it gets a little yellow—this is normal! It’s literally in shock, like that time I dyed my hair blonde and spent a week regretting everything. But here’s the thing: most plants bounce back if you just… leave them alone.
My golden rules for aftercare:
- Place in indirect light for the first week (direct sun = stress on stress)
- Don’t water again until the top 1-2 inches of soil are dry
- Resist the urge to poke and prod—let it settle!
My monstera had a full meltdown after I repotted it last spring. Droopy leaves, yellow spots, the works. I was ready to give up, but my friend Maya told me to wait it out. Two weeks later? It pushed out THREE new leaves. THREE, girl!
Special Cases: When Your Plant Is Being Difficult
Not all plants are created equal, and learning how to repot houseplants step by step sometimes means adapting for specific divas.
Succulents & Cacti: These babies HATE being wet. Use a well-draining cactus mix and wait a WEEK before watering after repotting. I killed a whole succulent arrangement by watering too soon. RIP, little buddies.
Fern: They love moisture but hate having wet feet. Use a moisture-retaining mix and keep them humid. I keep my fern in the bathroom and it’s absolutely thriving.
Prayer Plants: Extra sensitive to shock. They might droop dramatically for a week—just keep their soil slightly moist and they’ll bounce back.
Orchids: Honestly, just don’t. They’re a whole other level. But if you’re brave, they need special orchid bark mix, not regular soil. You’ve been warned!
My Final Thoughts (And a Little Pep Talk)
Learning how to repot houseplants step by step has truly changed my plant game. I used to avoid it like the plague, convinced I’d ruin everything. Now? I actually look forward to it! There’s something so satisfying about giving your plant babies a fresh start.
If you’re still nervous, just remember: plants want to live. They’re literally biologically programmed to survive. As long as you follow these steps, use good soil, and don’t drown them, you’re going to be just fine.
And if you DO lose a plant? It’s not failure—it’s experience. Every plant mom I know has a graveyard of fallen soldiers. My friend Katie has killed at least 30 plants and she now has an apartment that looks like a botanical garden. It’s all about learning and growing (pun intended).
So go ahead, girl! Grab that root-bound plant and give it the upgrade it deserves. Future you will thank present you when you’re surrounded by happy, thriving greenery.
And hey—if you get stuck? DM me on Instagram. I literally love talking about this stuff.
Happy potting! 🌿
P.S. Drop a comment below with what plant you’re repotting—I want to know! And tag me in your repotting stories because I seriously love seeing plant babies get new homes. You’ve got this, plant mama!

Leave a Reply