
The most practical, budget-conscious, and genuinely transformation-worthy DIY cabinet makeover guide — because your ugly cabinets are one weekend and under $200 away from becoming the best-looking feature in your kitchen.
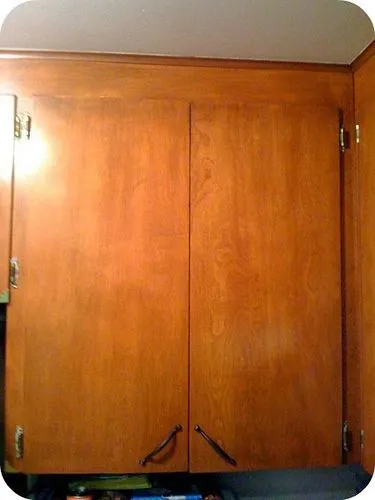
I need to tell you something before we get into this guide. The cabinets in the kitchen I moved into three years ago were, and I say this with complete sincerity and zero exaggeration, some of the ugliest kitchen cabinets I have ever seen in a home that was not actively being renovated.
They were a shade of brown that I can only describe as “disappointed oak” — a yellowing, orange-tinted stain on what was clearly once a neutral wood tone but had aged into something that made the entire kitchen feel tired, dated, and slightly depressing.
The hardware was brass in the specific way that early-2000s brass is brass — shiny, thick, and profoundly unflattering. The hinges were visible and they matched the hardware perfectly, which is to say they were also aggressively brass.
My budget for a kitchen renovation was exactly zero dollars. And I mean that — zero, not “limited,” zero. I needed to do something that required no contractor, no permits, no significant investment, and somehow still produced a result I could be proud of.
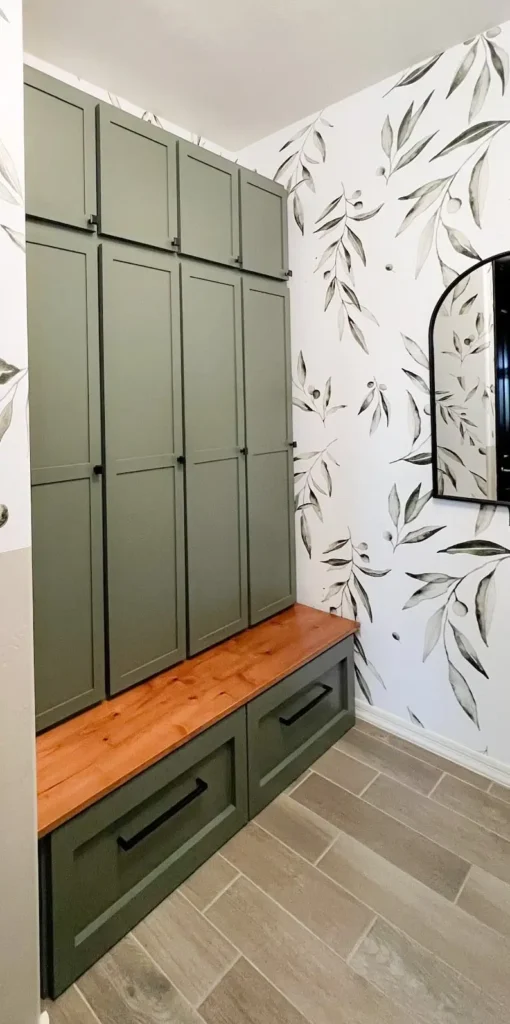
I did a DIY cabinet makeover for $178. And when I show people photos of my kitchen now — the same layout, the same cabinet boxes, the same countertops — they genuinely cannot believe it is the same kitchen. The before and after might be the most dramatic transformation photos I have ever taken, and all that changed was paint, new hardware, and a small amount of focused weekend effort.
My friend Tara did her own version of this six months later and came in even further under budget at $156 by buying her hardware at a discount home goods store rather than Amazon. Her kitchen, which had dark espresso cabinets from a 2010 renovation that had not aged well, went from looking oppressively dark and dated to looking like a bright, modern, intentional design choice — all from the same transformation process.
This guide is everything I learned from my project and from Tara’s, from the research I did before I started, and from the things I wish someone had told me before I touched a single cabinet. It will walk you through every step of a complete DIY cabinet makeover for under $200. Let’s transform those cabinets.
What a $200 DIY Cabinet Makeover Actually Includes
Before we get into the steps, let me be clear about what this budget covers and what it can realistically transform — because “under $200” needs to be grounded in specifics to be genuinely useful.
A complete DIY cabinet makeover for under $200 includes: a new paint color applied to all cabinet doors and drawer fronts, a fresh paint or complementary update to the cabinet boxes, new hardware (knobs and pulls) to replace whatever is currently there, and any small repairs or surface preparations needed to make the new finish look its best. This combination — new paint and new hardware — is the specific combination that produces the most dramatic transformation for the lowest possible cost.
What it does not include: new cabinet boxes, new doors, new hinges that require significant structural work, countertop replacements, or any electrical or plumbing work. This is specifically a cabinet surface and hardware makeover, not a structural renovation.
For a typical kitchen with 10 to 15 cabinet doors and 4 to 6 drawer fronts, the budget breakdown looks approximately like this: paint and primer ($60 to $80), new hardware ($50 to $80 depending on quantity and style), cleaning and prep supplies ($15 to $25), and brushes and rollers ($10 to $20). Total: $135 to $205. Most kitchens come in around $160 to $180 with thoughtful shopping.
Larger kitchens with more doors may push slightly over $200. Smaller kitchens or kitchens where you already have some supplies may come in well under. The range is real and achievable.
The Three Transformations Happening Simultaneously
A DIY cabinet makeover is not one transformation — it is three transformations happening at the same time, and understanding all three helps you make the decisions that produce the best overall result.
Transformation 1: Color. This is the most visible and most dramatic change. Going from dated oak brown to crisp white, or from tired espresso to warm sage green, or from dingy cream to fresh navy — the color change resets the visual age of the kitchen entirely. A color that feels fresh and current makes the whole kitchen feel like it was recently designed rather than recently inherited.
Transformation 2: Hardware. Hardware is the jewelry of kitchen cabinets, and the specific effect of replacing outdated hardware with modern hardware is genuinely disproportionate to the cost. Swapping shiny brass knobs for matte black bar pulls, or thick chrome handles for slim brushed gold pulls, changes the visual language of the entire kitchen. New hardware says “considered, modern choice” in a way that old hardware says “default from whenever this was originally built.”
Transformation 3: Cleanliness and intentionality. The act of removing cabinet doors, cleaning every surface thoroughly, and repainting with care produces a result that is dramatically cleaner and more intentional-looking than the same cabinets would look if they were simply cleaned and left. Fresh paint creates uniformity and a crispness that cleaning can approximate but never fully replicate.
These three transformations happening together are why the DIY cabinet makeover result consistently shocks people who knew the kitchen before — because no single one of them explains the full transformation. The combination does.
Your Complete Budget Shopping List
Here is everything you need for a complete DIY cabinet makeover under $200, with realistic price ranges for each item.
Paint and Primers:
- Bonding primer (Zinsser Bulls Eye 1-2-3 or equivalent) — $20 to $30 for a quart (sufficient for most kitchens)
- Cabinet-specific paint in your chosen color — $35 to $50 for a quart (sufficient for most kitchens; buy a small sample first and test on one door before committing to the full purchase)
- Optional: liquid deglosser if you want to skip any light sanding — $10 to $15
Application Tools:
- 4-inch foam mini rollers (at least 3 to 4 roller covers) — $8 to $12 for a multipack
- 2-inch angled synthetic bristle brush — $6 to $10
- Small roller frame — $5 to $8
- Paint tray and liners — $5 to $8
Prep and Hardware Supplies:
- TSP cleaner or heavy-duty kitchen degreaser — $8 to $12
- Cleaning rags or microfiber cloths — $5 to $10
- Painter’s tape — $5 to $8
- Drop cloths or plastic sheeting — $8 to $12
- Wood filler for any dings or holes — $5 to $8
- 220-grit sanding sponge (for smoothing wood filler and primed surfaces only) — $3 to $5
- Screwdriver or drill for hardware removal — already own
- Small plastic bags for hardware storage — $2 to $4
New Hardware:
- Cabinet pulls for drawer fronts and cabinet doors — $30 to $60 depending on quantity, style, and source
- If you need new screws to accommodate different hardware mounting holes — $5 to $8 additional
Total: approximately $145 to $200 depending on hardware choices and kitchen size.
Step 1: Choose Your Paint Color and Hardware Before You Buy Anything
The decisions you make before you buy a single supply determine the visual outcome of your entire project. Do not buy paint and hardware without having made deliberate, tested, considered choices — because paint and hardware are the two hardest things to return once opened.
Choosing your paint color:
The most important rule of choosing a cabinet paint color is to test it on an actual cabinet surface in your actual kitchen’s light before committing to a full quart or gallon. Buy a sample pot of your top two or three color options, brush a large swatch on one cabinet door, and observe it in your kitchen’s light at different times of day — morning, midday, and evening with kitchen lights on.
Colors that look perfect on a paint chip in the store frequently look different on actual cabinet surfaces in actual room light. The cabinet surface texture, the adjacent countertop color, and your specific light conditions all influence how a color reads. The sample test is not optional.
For color guidance specific to your situation: light kitchens with good natural light can handle almost any color including dark, dramatic choices. Dark or small kitchens benefit significantly from lighter colors that maximize the available light. Cabinets with busy countertops need simpler, calmer colors. Cabinets with plain countertops can handle more personality.
The colors I have found consistently produce the most dramatic and satisfying cabinet makeover results across the most kitchen types: warm creamy white (Benjamin Moore White Dove or similar), soft sage green, dusty navy, warm greige, and classic charcoal. All five have been tested in multiple real kitchens and all five consistently produce results that look intentional, current, and genuinely beautiful.
Choosing your hardware:
Hardware shopping is one of the most genuinely fun parts of this project — and it is the part where spending a little more than the minimum produces a significantly better result. The difference between $2 knobs and $6 pulls is visible in a way that matters.
The current hardware trends that photograph best and look most current: matte black bar pulls (the most versatile, works with almost any cabinet color), brushed gold or unlacquered brass pulls (the warmest, most flattering option especially with white or sage cabinets), brushed nickel or chrome bar pulls (the cleanest, most modern option for white or grey cabinets).
Before ordering hardware, measure the existing hole spacing on your cabinet doors and drawer fronts — the distance between the two screw holes on a pull, called the center-to-center measurement. Standard center-to-center measurements are 3 inches and 3.75 inches. Buying hardware with the same center-to-center as your existing holes means you do not need to fill old holes or drill new ones. If you choose hardware with different hole spacing, you need to fill the old holes with wood filler, sand smooth, and re-prime those spots before painting.
Order one piece of your chosen hardware before ordering the full set — hold it against your cabinet door, against your countertop, against your wall color. Hardware that looks beautiful in an online photo can look different in your specific kitchen. The test-one approach costs a few extra days of project time and saves you from a full hardware return.
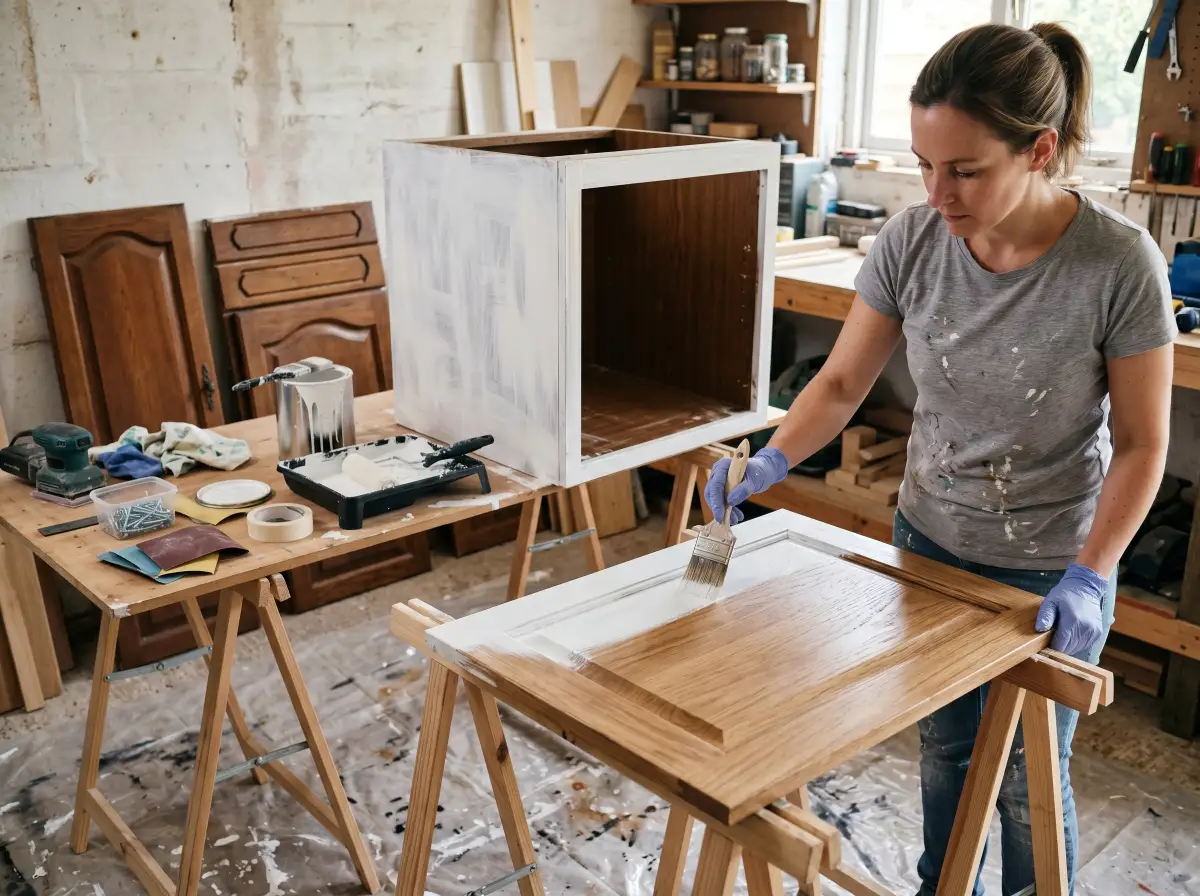
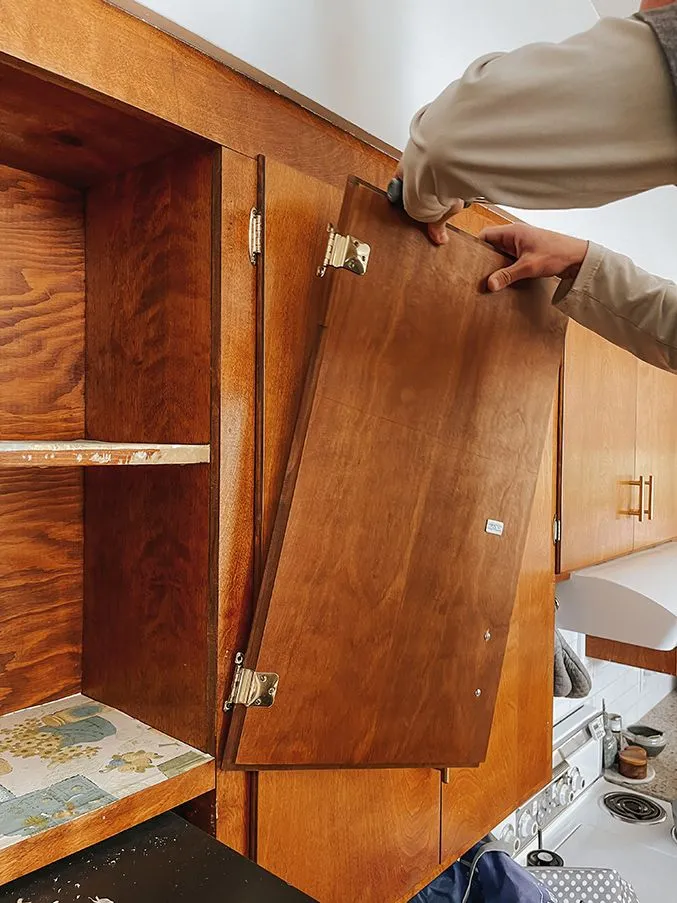
Step 2: Remove Every Door, Drawer Front, and Hardware
Remove every cabinet door and every drawer front. Remove every piece of hardware — every knob, every pull, every hinge if you are updating hinges, every catch. Bag the hardware by cabinet and label each bag.
Number every cabinet door on the back — this is especially important in this project because your doors are coming off, being painted in a separate space, and returning. Knowing which door goes back to which opening eliminates a significant reinstallation confusion.
If your hinges are the old-style visible hinges that attach to the inside of the door and the inside of the cabinet frame, this is your opportunity to assess whether you want to upgrade to concealed European hinges — the kind that are invisible from the outside of the cabinet. Concealed hinges are a hardware upgrade that dramatically modernizes the look of any kitchen and costs roughly $2 to $4 per hinge plus an afternoon of installation. They require drilling a 35mm hole in the back of the door with a specific drill bit, but this is straightforward and the visual result is extraordinary. If this is your project and you want the absolute maximum transformation, upgrading to concealed hinges is the single additional investment that I most recommend adding.
Set all removed doors and drawer fronts in a clean, flat space where they can lie horizontally while you paint them. A table covered in drop cloth, sawhorses with a board across, or even clean cardboard on the floor of a garage or spare room all work.
Step 3: Repair Any Surface Damage Before Anything Else
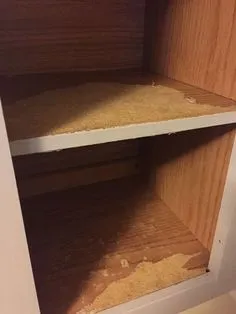
Before a single drop of cleaner or primer touches your cabinets, do a complete surface assessment and repair any damage you find. This step is the one most DIYers rush and the one whose omission shows most clearly in the finished result.
Look at every door, every drawer front, and every cabinet box for: dents and dings in the wood, holes from old hardware (if you are changing hole spacing), peeling or chipped existing finish, deep scratches, water damage or swelling, and delaminating veneer.
Fill every dent, every ding, and every old hardware hole with wood filler. Apply the filler in thin layers, allowing each to dry before applying the next (wood filler shrinks as it dries, so a single thick application will sink below the surface level). Once dry, sand smooth with a 220-grit sanding sponge — flush with the surrounding surface, no ridges, no bumps. The filled and sanded surface should be completely invisible to the touch.
Re-glue any delaminating veneer with wood glue, clamp until dry, then sand any raised edges smooth. Address water damage by sanding back to clean wood and treating with a stain-blocking primer in that specific area.
A perfectly smooth, fully repaired surface before you apply a drop of primer is what separates a professional-looking result from a result that makes it obvious the project was DIY.
Step 4: Clean Every Surface With TSP or Degreaser
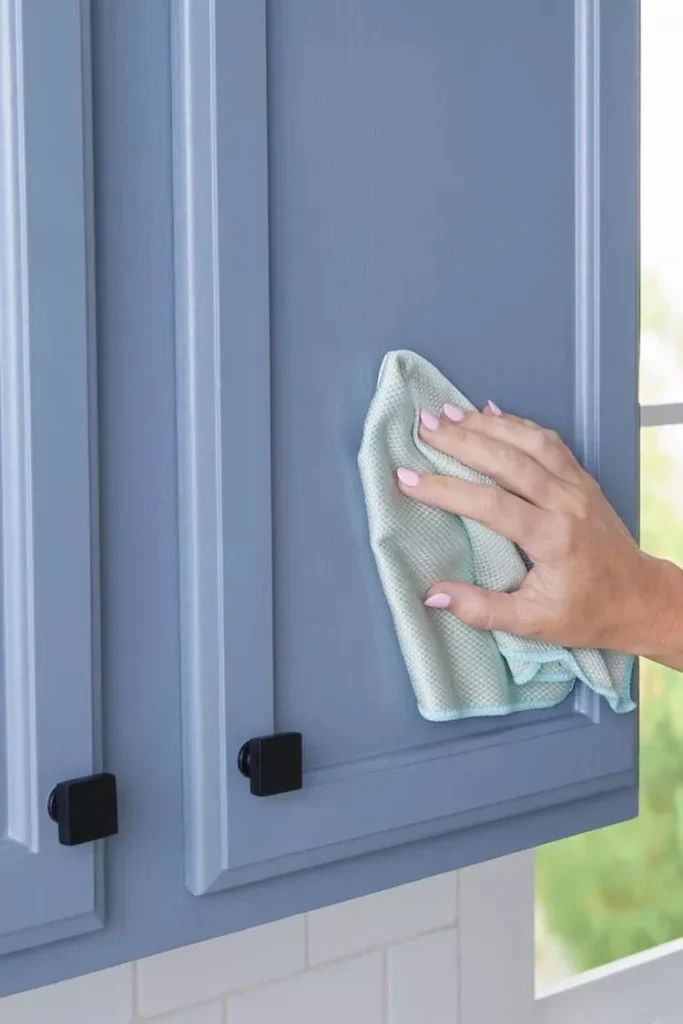
Kitchen cabinet surfaces carry an invisible film of grease, cooking residue, and general grime that is the enemy of paint adhesion. Paint applied over this film will peel, no matter how good the paint is and no matter how good the primer is.
Clean every surface — every door face, every door back, every door edge, every cabinet box face, every cabinet box interior (if you are painting it) — with TSP cleaner or a strong kitchen degreaser. Wear rubber gloves. Work the cleaner into the surface with a rag, paying particular attention to the areas around existing hardware holes and pulls where grease concentrates.
Wipe with clean water to remove cleaning residue. Let everything dry completely — several hours minimum, overnight if possible. Do not rush this step by applying heat or moving too quickly to the next step. Surfaces that are not completely dry when you prime will not bond properly.
This is the same cleaning step as in the no-sanding guide — because it is equally critical here and it cannot be overstated how much the quality of your clean affects the quality of your finished paint job
Step 5: Lightly Scuff-Sand or Degloss All Surfaces
Unlike the no-sand guide, this complete makeover guide includes a light scuff-sand — not to shape or smooth anything, but to provide additional mechanical adhesion for the primer, working alongside the chemical adhesion that deglosser provides.
If your existing cabinet finish is high-gloss (the common factory finish on many cabinets), a light pass with a 220-grit sanding sponge on all flat surfaces creates a slightly rough texture that primer adheres to far more aggressively than a perfectly smooth, glossy surface. You are not removing material. You are not changing the shape of anything. You are creating microscopic texture that gives the primer a better grip.
After sanding, wipe all surfaces with a tack cloth to remove every particle of dust. Do not skip the tack cloth — dust particles in a paint surface are visible and they are permanent.
Alternatively, if you want to avoid sanding entirely, apply liquid deglosser as described in the previous guide. Either approach prepares the surface for primer. Choose the one you are more comfortable with.
Step 6: Apply Bonding Primer in Thin, Even Coats
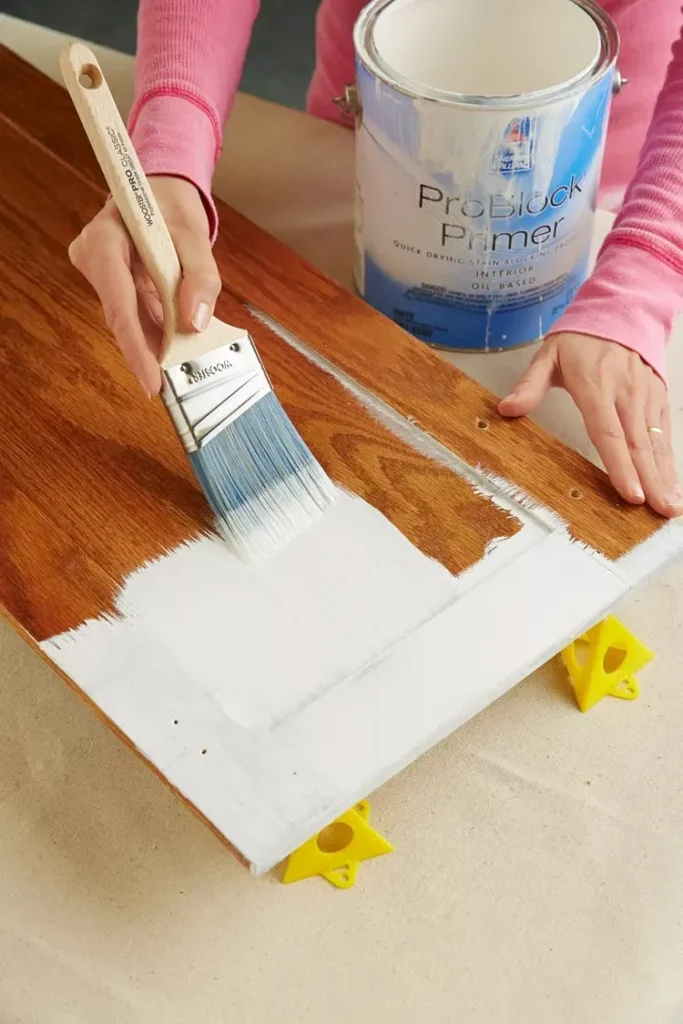
Apply your bonding primer to every surface that will be painted — all cabinet door faces and backs, drawer fronts, and cabinet box faces and interiors.
Use a foam roller on flat surfaces for the smoothest possible primer coat. Use your angled brush for recessed panels, detail areas, and edges. Roll in one direction, keep a wet edge, apply thin coats rather than trying to achieve full coverage in one pass.
Most bonding primers require two to four hours to dry before recoating. Apply your first coat, allow it to dry completely, and then inspect every surface. If you see any surface irregularities — primer texture that is too heavy, runs, or areas that need additional build — very lightly sand those spots with 220-grit and apply a second coat.
After the primer is fully dry, the surfaces should feel smooth and have a uniform, slightly chalky appearance. They should not be shiny. They should accept paint adhesively and consistently across every area.
Step 7: Apply Cabinet Paint in Multiple Thin Coats
Apply your cabinet paint using the same foam roller and angled brush method as the primer. Thin coats, applied patiently, with full drying time between each coat. This is the instruction that the entire quality of your result depends on and it bears repeating: thin coats, multiple of them, with complete patience between each one.
For most cabinet paints, two to three coats produce the coverage and depth of color you need. Benjamin Moore Advance and Sherwin-Williams Emerald Urethane, the two professional standards, typically achieve excellent coverage in two coats on a well-primed surface.
The specific technique that produces the smoothest finish with a foam roller: load the roller moderately (not dripping, not barely loaded), roll in one direction consistently, and do not overwork the paint by rolling back and forth repeatedly. Cabinet paint at its working viscosity is designed to self-level as it dries — if you keep rolling it after it has started to set, you disrupt the self-leveling process and create texture. Roll it on, leave it, let it level itself.
Between each coat, check for any drips or runs at the edges and corners — catch them while the paint is still wet and brush them out before they dry. Dried drips are visible in a finished cabinet paint job and are annoying to fix after the fact.
Allow the final coat to cure for at least 48 hours before handling — longer if your paint manufacturer recommends it. Cabinet paint may feel dry to the touch in hours but continues to harden and cure for days to weeks. Handling freshly painted doors before they have cured sufficiently is how dents and marks appear in a finish that looked perfect when you finished painting.
Step 8: Install New Hardware and Rehang Doors
With your cabinet doors fully cured, your drawer fronts fully cured, and your new hardware in hand — this is the moment where the full transformation reveals itself, and it is genuinely exciting.
Install your new hardware first on the drawer fronts while they are still flat and easy to work with. If your new hardware uses the same hole spacing as the old hardware, the screws drive straight in. If you changed hole spacing, the filled-and-primed old holes should be invisible under your paint, and your new holes are drilled fresh in the correct positions using a template (most hardware comes with a template, or you can make one from cardboard).
Rehang the doors in the order of your numbering system — start with number one, work through in sequence. Adjust hinges as needed for perfect alignment — properly hung cabinet doors sit flush with the cabinet frame, gap evenly from door to door, and swing fully open without catching.
Step back when the last door is hung and the last piece of hardware is installed. Look at your kitchen. Take a photo from the same position as your before photo if you have one.
That is your kitchen. Your actual kitchen, that you did not spend thousands of dollars renovating. That you transformed for under $200 and one weekend of focused, patient work. It looks different from how it has ever looked before. It looks intentional. It looks current. It looks like someone who cares about their home lives there.
The Honest Timeline and Effort Assessment
I want to be honest with you about how long this project actually takes, because every DIY guide that makes a project sound faster than it is does a disservice to the person doing it.
Day 1 (Friday evening or Saturday morning): Remove all doors and hardware, repair surface damage, clean everything thoroughly. 3 to 4 hours.
Day 1 continued (Saturday afternoon): Lightly scuff or degloss, apply first primer coat to all surfaces. 2 to 3 hours.
Day 2 (Sunday): Second primer coat if needed, first paint coat on all surfaces. Let dry. 2 to 3 hours active work plus drying time.
Day 3 (following weekend): Second paint coat. Third if needed. 2 to 3 hours.
Day 4 (second following weekend): Final inspection, install hardware, rehang doors, adjust and align. 2 to 3 hours.
Realistic total: two to three weekends of work, spread across three to four weekends total to allow proper drying and curing time between coats. The reason this is spread across weekends rather than done in one week is the curing time of quality cabinet paint — rushing that process produces a worse result.
If you want to compress the timeline, you can apply multiple coats on the same day as long as you respect the recoat windows on your specific paint and primer. Two coats of paint in one day is achievable. Three is typically pushing it.
The $200 Cabinet Makeover Is the Most Satisfying DIY Project You Will Ever Do
I have said this to at least a dozen friends since I did my own project, and every single one who has done it has come back and said the exact same thing: it is the project that produces the most dramatic visible result for the least money and the least irreversible commitment.
You do not move walls. You do not break anything that cannot be fixed. You do not require permits or contractors or weeks of living in construction. You do it over a few weekends, you use a few hundred dollars of materials, and you end up with a kitchen that looks like a different house.
My kitchen, with its disappointed oak cabinets, is now a warm creamy white with matte black bar pulls and concealed hinges. The before and after has been the most shared thing I have ever posted. People who had been in my kitchen before cannot reconcile what they are looking at with what they remember. People who have not been in my kitchen assume I spent at least $10,000 renovating it.
I spent $178. And every single day since, walking into that kitchen has felt like walking into a home that belongs to someone who has taken good care of it.
That kitchen is yours. This weekend. Under $200.
Now go pin this complete guide, share it with every single person you know who has been living with cabinets they hate because they cannot afford a renovation, and go take your before photos this weekend because you are going to want them.
Pin this and save it — this is the DIY cabinet makeover guide that is going to be responsible for the most dramatic $200 home transformation you have ever seen!


Leave a Reply